Now that I have the book, I have been able to kind of catch up with Kayte's every-two-weeks group of bakers, only I haven't been able to make the bagels which they all posted on their websites a few days ago. I have to order some non-disastatic malt powder from King Arthur Flour (one of my favorite websites, like, evah) to make them taste like the real thing, and until I do that, the bagels are on hold. Brioche is next on the list and I've still got a couple of weeks before I have to post that, so I made some pita bread in the meantime.
The recipe used to make pita bread in The Bread Baker's Apprentice is actually to one for Lavash Crackers on pages 178 and 180 (photograph on page 179.) Since this is a cracker recipe, it makes a flattish kind of bread that has to be rolled out paper-thin, as you can imagine. However, over in the left hand margin on page 178, Peter Reinhart writes that if you divide the dough out into about four 6-ounce balls, roll the balls out to about 1/4" and bake them in a very hot oven until they poof up, and then remove them, cool them and cut them in half, you will have a very tasty pita pocket.
We really love pita pockets, so this seemed like a nice recipe to try out.
I made the lavash dough yesterday: it is a really simple one consisting of flour, salt, yeast, honey, veg oil and water, with some sesame or poppy seeds, if you want. I decided that I'd like to try to knead this dough by hand, so I did, using the push-and-fold-and-turn-and-push method that Peter talks about in the book. The instructions said that I'd need to knead (haha) for about ten minutes so that the dough would be pliable and stretchy and able to pass the "windowpane test": that's when you know the dough's been mixed long enough. In actuality, that took about thirteen minutes of kneading, but the instructions also said that I wouldn't have to use more than 1/2 cup of water, too -- I ended up needing an extra palm-full (maybe a tablespoon or two?) of lukewarm water to make the dough incorporate smoothly.
I decided that I wanted to use Peter's method of retarding the dough, so I sprayed a bowl with oil and put the dough ball in the fridge overnight. This morning, I got it out of the fridge at 7:00, having turned the oven on to 170o , and while the oven heated, I put the ball of chilled lavash dough into my larger glass mixing bowl. When the oven had heated, I turned it off again and put the glass mixing bowl into the oven, covered by a tea towel, and left it to rise with the oven door partially open.
Since the dough was so cold, it took about three hours it to double in size. I just kept an eye on it, and noted that when I got back from picking Kieren up at the driving school, I could actually smell the lovely, yeasty aroma in the air as I came through the back door. "I bet it's time!" I thought, and upon peering into the mixing bowl, I noted that it was, indeed, time.
Now here's where things got a little hairy, mostly because I missed the part about the 500o oven the first time around. I heated the oven up to 350o instead, which was the temp at which the crackers were supposed to bake. I did not know this until AFTER I'd already baked my pitas and had them cooling on a wire rack, more's the pity. You know, if I could just READ THE INSTRUCTIONS and PAY ATTENTION every now and then, I might be able, with a great deal of prayer and a better attitude, be a fairly decent cook someday, but for right now, I'm going to have to say that I'm not working up to my potential and talk too much in class.
So anyway, I divided my dough up into six small balls. This made six little tea-sandwich sized pitas, which I thought would be just too cute with cucumber and a little sliced tomato. I'd like to do this again and divide the dough into four larger balls, which would make lunch sandwich sized pockets. However, the six small balls were easy to roll out into the typical circle shape. Peter said that the dough would be a bit stretchy and springy and that it might be necessary to pick up the dough and "wave it around" from time to time to allow the glutens to relax. This gave me a mental picture of running my rolled dough up a flagpole like Old Glory and allowing it to flap in the breeze, but whatevs. I just picked up each circle and allowed it to kind of stretch this way and that. I did minimal waving.
After the recommended five minute resting period -- all that flapping and waving is very tiring to infant dough -- I put the dough on my parchmented baking sheets and gave them a misting with water and gently peppered them with poppy seeds. So cute! And the slid them both onto the middle rack of my oven, which was, of course, not heated to the proper temperature.
Peter's instructions were terribly vague about how long to cook the pitas. He wrote: "Bake just until they inflate and form a pocket." Huh? Peter, how long IS that? Because, you see, I do not have a wall oven at this house and I did not want to spend a whole lot of time crouched down on the floor peeking through that little window. I made do with just setting the oven timer for six minutes and then checking to see if any little doughy balloons were waiting for me.
They were not.
So I set the timer for five minutes longer.
Nope. Still wasn't happening.
Discouraged, I set the timer for four more minutes and plopped down onto a chair to wait. At the beeping, I got up and noted that the pitas had gone pouffy (bet it wouldn't have taken as long if I'd had the right oven temp, duhhh....) so I whisked them out of the oven and put them on my wire rack.
I was crucially disappointed to find out that my darling little pitas were as solid as hockey pucks. That wasn't pouffiness I had noticed; it was just plain old risen dough, well baked.
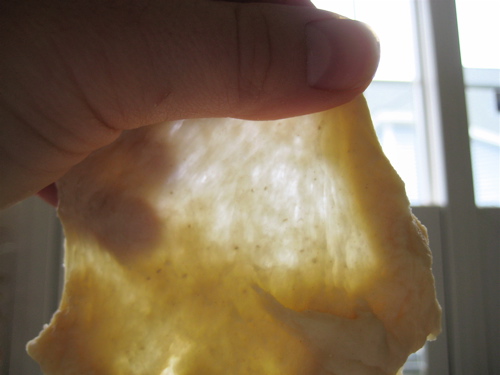
Sulking, I let them cool down as I sat at the kitchen table with my head in my hands, and then got out my pizza cutter to slice one in half. Sure enough, it was solid. But... wait! The crust seemed thick-ish and ready to separate from the crumb, so I decided to do a little experiment, as one might do with a bagel or a Kaiser roll: I got out a fork and peeled the crumb away from the crust et voilà! A little teeny pita pocket!
They are so cute. And very tasty, too. I'm not sure how I lucked in to that totally unexpected success, but they're sitting out there in the kitchen where I can see them right now. Meelyn and I were just discussing the possibilities of stuffing them with a couple of spinach leaves, two cucumber slices and a slice of medium-sized tomato, plus a bit of mayonnaise. I think that sounds delightfully summery, maybe a nice little appetizer for a salad kind of meal. Oooh, maybe a slice of bacon, doubled in half, with the tomato and some lettuce? Mmmm!
The possibilities are endless with Peter's pitas.


Tuesdays with Dorie: Baking with Dorie - Cranberry Spice Squares
-
The fourteenth recipe I made with the Tuesdays with Dorie: Baking with
Dorie group is Cranberry Spice Squares and can be found in the Baking with
Dorie boo...
3 years ago


1 comment:
Oh, that blt version sounds very tempting. Sure happy I read this before they came up on the list to make as your mistakes are the ones I always make. You would think that two people like us who are such avid readers would be able to read a recipe now and again, wouldn't you? LOL. Your little versions sound so cute, will probably go there with mine, too. YUM. All your fillings sound fantastic. I have to learn to drop by there way more often.
Post a Comment